S1 - All Components, Single Machine (Docker)
Overview
This guide covers installing the full CAST Imaging suite on a single machine using Docker. All components are deployed on one host.
What is installed:
| Component | Description |
|---|---|
imaging-services |
Front-end services: gateway, console, auth, SSO, control panel |
imaging-viewer |
Results viewer: ETL, APIs, AI service/GraphRAG service, Neo4j, server |
analysis-node |
Analysis engine (includes CAST Imaging Core ≥ 8.4 as a Docker image) |
dashboards |
CAST Dashboards: Management, Engineering and Security |
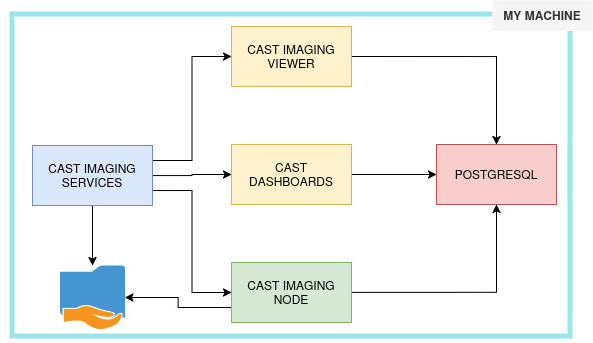
When to use: POC, testing, demo, or small production environments. Ensure the host machine has sufficient resources to run all components - see Hardware requirements.
The database instance (postgresql) is bundled and deployed automatically as part of this installation. An external PostgreSQL instance can optionally be used instead - see the DB_MODE variable below.
Requirements
The requirements below are tailored to this scenario (single machine, standalone mode). Before you install, read the full requirements pages, which cover all platforms and topologies in detail:
Hardware · Software · Database · Disk space
Components installed
| Component | Role |
|---|---|
imaging-services | Front-end services: gateway, console, auth, SSO, control panel |
imaging-viewer | Results viewer: ETL, APIs, AI/GraphRAG service, Neo4j, server |
analysis-node | Analysis engine |
dashboards | CAST Health/Management Dashboards (read-only KPIs) |
Hardware
- RAM: 32GB RAM absolute minimum
- Installation disk: approx. 20GB for the installation
- Analysis & result storage: 256GB minimum (1TB for multiple complex/large applications)
TCP ports
Only the ports for this scenario's components are listed (Linux via Docker/Podman):
imaging-services
- 2285: PostgreSQL (embedded)
- 2381: Control Panel
- 8090: Gateway
- 8091: Console
- 8092: Authorization
- 8096: Keycloak
- 8098: Control Panel
imaging-viewer
- 7473, 7474, 7687: Neo4j
- 8070: API service (>= 3.4.0-funcrel)
- 8082: AI
- 8083: Viewer front-end
- 8084: Login
- 8286: GraphRAG
- 9000: Viewer
- 9001: ETL
- 9980: Source code
analysis-node
- 8089: Analysis Node
dashboards
- 8097: Dashboards
Firewall: Open only port 8090 (TCP) inbound if you or your users need to access CAST Imaging from another machine on the network.
Database
CAST Imaging requires PostgreSQL. PostgreSQL 14.x-18.x (64-bit); 18.x recommended. Releases 16.x and above require specific com.castsoftware.imaging.core versions.
On Linux via Docker/Podman, a PostgreSQL instance is provided and managed automatically as a container and used by default (DB_MODE=embedded). To use your own database instead, set DB_MODE=external in configuration.conf and supply the connection details; you are also free to add further database instances after installation.
Schemas created automatically:
- Per onboarded application:
<application_name>_local,<application_name>_central,<application_name>_mngt general_measure(consolidated Dashboard results)control_panel(persistence)keycloak(persistence)
Software
Operating system, Java, supported browsers and user/service permissions apply. See the full software requirements and the disk space requirements.
Before you start
-
Air-gapped / offline environments: If your target machine does not have internet access, you must pre-download all required Docker images on an internet-connected machine and transfer them before running the installer. See the Air-gapped installation section below.
-
Extend Local Server: If your environment does not permit access to CAST Extend over the internet, you will need to install the Extend Local Server separately before completing this guide.
Step 1 - Download the installation media
Download the installer using curl:
$ curl -# -O -J "https://extend.castsoftware.com/api/package/download/com.castsoftware.imaging.all.docker/<version>?platform=linux_x64" \
  -H "x-nuget-apikey: <api-key>" \
  -H "accept: application/octet-stream"
Where:
<version>: uselatestfor the most recent release, or a specific version such as3.6.0-funcrel<api-key>: your CAST Extend API key (obtain from https://extend.castsoftware.com/#/profile/settings )
Example for latest release:
$ curl -# -O -J "https://extend.castsoftware.com/api/package/download/com.castsoftware.imaging.all.docker/latest?platform=linux_x64" \
  -H "x-nuget-apikey: a9999a9a-c999-999d-999b" \
  -H "accept: application/octet-stream"
Unzip the resulting ZIP file anywhere on your local disk:
$ unzip /path/to/<installer>.zip -d /path/to/folder
Where:
-d /path/to/folder: tells the unzip utility to unzip to a specific folder (omitting the option will unzip to the current folder)
The following files and folders will be created:
cast-imaging-dashboards/(folder)cast-imaging-node/(folder)cast-imaging-services/(folder)cast-imaging-viewer/(folder)tools/(folder)cast-imaging-install.shcast-imaging-install-podman.shcast-imaging-update.shconfiguration.conf
Air-gapped installation
If the target machine(s) has no internet access, pull and export all required images on an internet-connected machine, then transfer and load them on the target machine(s) before running the installer.
On an internet-connected machine - pull and export each image:
$ docker pull <image>:<version>
$ docker save <image>:<version> -o <filename>.tar
Transfer all .tar archives to the target machine (secure copy or removable media).
On the target machine - load each image:
$ docker load -i <filename>.tar
Verify all images are available:
$ docker image ls
Required images:
Depending on your chosen deployment scenario, it may not be necessary to download all images.
| Component | Image | Pull & export | Load |
|---|---|---|---|
Gateway (imaging-services) |
castimaging/gateway |
docker pull castimaging/gateway:<ver> · docker save castimaging/gateway:<ver> -o gateway.tar |
docker load -i gateway.tar |
Control Panel (imaging-services) |
castimaging/admin-center |
docker pull castimaging/admin-center:<ver> · docker save castimaging/admin-center:<ver> -o admin-center.tar |
docker load -i admin-center.tar |
SSO Service (imaging-services) |
castimaging/sso-service |
docker pull castimaging/sso-service:<ver> · docker save castimaging/sso-service:<ver> -o sso-service.tar |
docker load -i sso-service.tar |
Auth Service (imaging-services) |
castimaging/auth-service |
docker pull castimaging/auth-service:<ver> · docker save castimaging/auth-service:<ver> -o auth-service.tar |
docker load -i auth-service.tar |
Console (imaging-services) |
castimaging/console |
docker pull castimaging/console:<ver> · docker save castimaging/console:<ver> -o console.tar |
docker load -i console.tar |
Dashboards (dashboards) |
castimaging/dashboards-v3 |
docker pull castimaging/dashboards-v3:<ver> · docker save castimaging/dashboards-v3:<ver> -o dashboards-v3.tar |
docker load -i dashboards-v3.tar |
Analysis node (analysis-node) |
castimaging/analysis-node |
docker pull castimaging/analysis-node:<ver> · docker save castimaging/analysis-node:<ver> -o analysis-node.tar |
docker load -i analysis-node.tar |
ETL Service (imaging-viewer) |
castimaging/etl-service |
docker pull castimaging/etl-service:<ver> · docker save castimaging/etl-service:<ver> -o etl-service.tar |
docker load -i etl-service.tar |
AI Service (imaging-viewer) |
castimaging/ai-service |
docker pull castimaging/ai-service:<ver> · docker save castimaging/ai-service:<ver> -o ai-service.tar |
docker load -i ai-service.tar |
APIs Service (imaging-viewer) |
castimaging/imaging-apis |
docker pull castimaging/imaging-apis:<ver> · docker save castimaging/imaging-apis:<ver> -o imaging-apis.tar |
docker load -i imaging-apis.tar |
Viewer Server (imaging-viewer) |
castimaging/viewer |
docker pull castimaging/viewer:<ver> · docker save castimaging/viewer:<ver> -o viewer.tar |
docker load -i viewer.tar |
Neo4j (imaging-viewer) |
castimaging/neo4j |
docker pull castimaging/neo4j:<ver> · docker save castimaging/neo4j:<ver> -o neo4j.tar |
docker load -i neo4j.tar |
PostgreSQL (required for 3.0.x-funcrel - 3.5.x-funcrel, for 3.6.0-funcrel or later, required only when DB_MODE=embedded) |
postgres:15 |
docker pull postgres:15 · docker save postgres:15 -o postgres15.tar |
docker load -i postgres15.tar |
| curl (≥ 3.6.0-funcrel: for 3.6.0-funcrel use curl 8.7.1; for 3.6.1-funcrel or later use 8.19.0.) | curlimages/curl |
docker pull curlimages/curl:<ver> · docker save curlimages/curl:<ver> -o curl.tar |
docker load -i curl.tar |
psql (required in ≥ 3.6.0-funcrel when using a custom/external PostgreSQL instance - DB_MODE=external) |
alpine/psql |
docker pull alpine/psql:latestdocker save alpine/psql:latest -o psql.tar |
docker load -i psql.tar |
| CAST Extend Local Server | castimaging/extend-proxy |
docker pull castimaging/extend-proxydocker save castimaging/extend-proxy -o extend-proxy.tar |
docker load -i extend-proxy.tar |
After loading all images, open configuration.conf in a text editor and set:
OFFLINE_MODE=true
Step 2 - Configure the installation
Locate the configuration.conf file at the root of the unzipped files and open it in a text editor (nano or vi). See Installation variables for a full reference of all variables.
General rules:
- Use forward slashes for all paths
- Do not use
localhost,127.0.0.1, or simple hostnames for_HOSTNAMEvariables - CAST recommends leaving port numbers at default values where possible
Note in particular:
IMAGING_SERVICES_HOSTNAME
Set this to the FQDN or static IP address of the host machine:
# Find your FQDN
$ hostname -f

# Or find your IP address
$ hostname -I
Then set in configuration.conf:
IMAGING_SERVICES_HOSTNAME=<your-fqdn-or-ip>
Leave all other xxx_HOSTNAME variables blank - they are not required for a single-machine deployment.
DB_MODE
Use DB_MODE (on the machine running imaging-services for multi-machine mode) to control whether the embedded PostgreSQL Docker container is used or an external PostgreSQL instance:
DB_MODE=embedded(default) - deploys apostgrescontainer as part of the installationDB_MODE=external- uses an existing external PostgreSQL instance (configure the relevantDB_*variables)
See Installation variables and Database requirements for details.
Neo4j memory settings (optional)
If you need to reduce Neo4j memory usage before installation (e.g. for a test deployment), edit the cast-imaging-viewer/.env file (on the imaging-viewer machine) and modify:
NEO4J_server_memory_heap_initial__size=<size>
NEO4J_server_memory_heap_max__size=<size>
NEO4J_dbms_memory_transaction_total_max=<size>
Default values are 12 GB each. See Customizing Neo4j for details.
Domain mapping (optional)
To isolate imaging-viewer results per domain in dedicated Neo4j databases, you can enable the domain/tenant mapping feature. CAST strongly recommends enabling this now, before any applications are onboarded - enabling it later in an existing installation causes irreversible loss of customizations (tags, saved views, post-it notes, custom objects).
Update the following variable in configuration.conf (on the imaging-services machine for multi-machine deployments):
IMAGING_DOMAIN_SYNCHRO_ENABLED=true
See Domain/tenant mapping feature for full details and prerequisites.
Firewall
For single-machine deployments, open only port 8090 (TCP) inbound if you or your users need to access CAST Imaging from another machine on the network.
Step 3 - Make the install script executable
Ensure the installation script is set to executable:
$ chmod +x cast-imaging-install.sh
Step 4 - Run the installation
Run the following command:
$ ./cast-imaging-install.sh all
Installation prechecks
Before it makes any change to the machine, the installer validates the environment it is about to install into: the operating system, the software it depends on, the hardware resources available, the ports it needs, and the endpoints it must reach. These checks run automatically and cannot be skipped.
Where a blocking failure is reported, the installation does not start and nothing on the machine is changed: resolve the reported condition and run the installer again. Where a warning is reported, the installation continues.
See Installation prechecks for the full list of checks, and the Precheck message reference for the meaning of a specific failure or warning message.
Step 5 - Verify the installation
Check that all containers are running:
$ docker ps
You should see 13 containers (or 12 if using an external PostgreSQL instance):
| Container | Port(s) | Base OS |
|---|---|---|
postgres |
2285 | Debian GNU/Linux 12 |
gateway |
8090 | Alpine Linux |
console |
8091 | Alpine Linux |
auth-service |
8092 | Alpine Linux |
sso-service |
8096 | Red Hat Enterprise Linux 9 |
control-panel |
2381, 8098 | Alpine Linux |
neo4j |
7473, 7474, 7687 | Debian GNU/Linux 13 |
etl |
9001 | Debian GNU/Linux 13 |
open_ai_manager |
8082, 8286 | Alpine Linux |
server |
9000, 8084, 8083 | Alpine Linux |
imaging-apis |
8070 | Debian GNU/Linux 13 |
analysis-node |
8089 | Rocky Linux 8 |
dashboards |
8097 | Ubuntu 24.04 |
- The
sso-servicecontainer memory allocation is set to 70% of available container memory by default. See SSO service memory management to adjust this. - If a container fails to start, check its logs via
$ docker logs <container_name>
Set permissions on the analysis-node data volume
Run the following command to ensure the root user has access to the persistent volumes shared with the analysis-node container:
$ chown -R 0:0 /opt/cast/shared
Replace /opt/cast/shared with the shared sub-folder of your INSTALL_DIR value if you changed the default.
Data storage
All analysis data is stored under the INSTALL_DIR path (/opt/cast by default).
Database data for the embedded PostgreSQL instance (DB_MODE=embedded) is stored in the Docker volume cast-imaging-db-data (view with docker volume ls). By default the data is stored under $INSTALL_DIR/cast-imaging-db-data/data (for example /opt/cast/cast-imaging-db-data/data). From 3.6.4-funcrel you can store it on a different host path by setting CAST_IMAGING_DB_DATA_VOLUME_PATH in configuration.conf (see Installation variables). If you reinstall imaging-services and this volume already exists, it will be reused and existing applications will remain visible.
Step 6 - Initial startup configuration
Browse to:
http://<IMAGING_SERVICES_HOSTNAME>:8090
Log in using the default credentials: admin / admin
Available from 3.6.5-funcrel: on your first login after a fresh installation, if the admin account is still using the default password, you are redirected to a mandatory password change screen. After setting a new password, you must complete your user profile (first name, last name, and email address) before you can access CAST Imaging.
Configure the Licensing strategy. Choose one of:
Named Application- each onboarded application requires its own dedicated license keyContributing Developers- a global license key based on the number of contributing developers
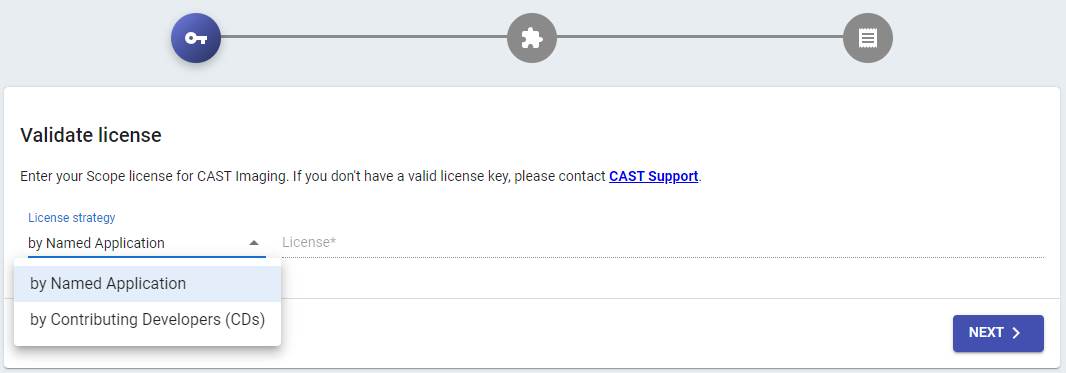
You can switch license key strategy after onboarding applications. See Manage your license keys.
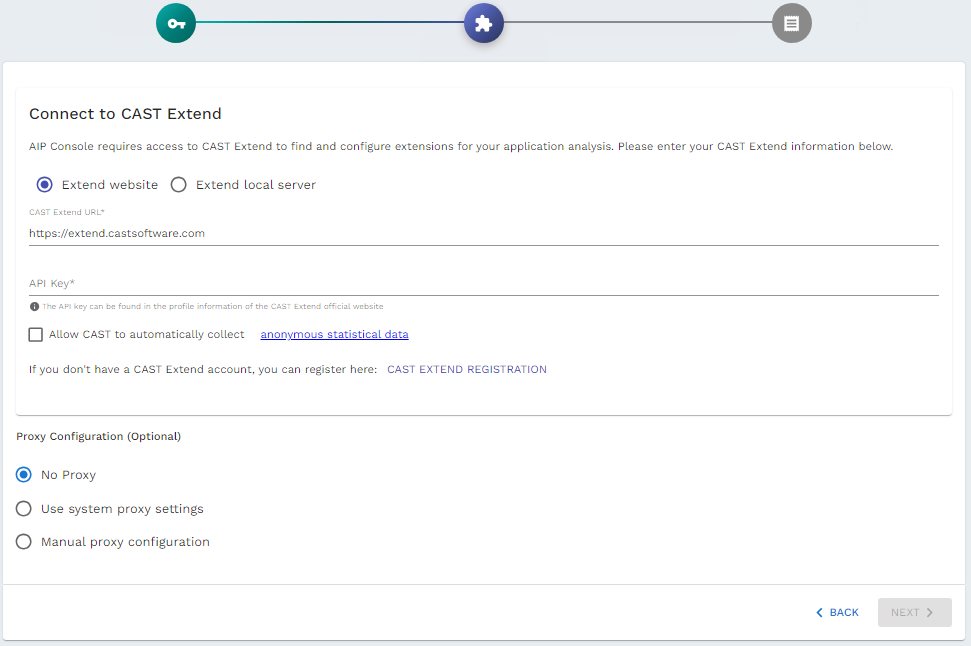
Configure CAST Extend settings and Proxy settings:
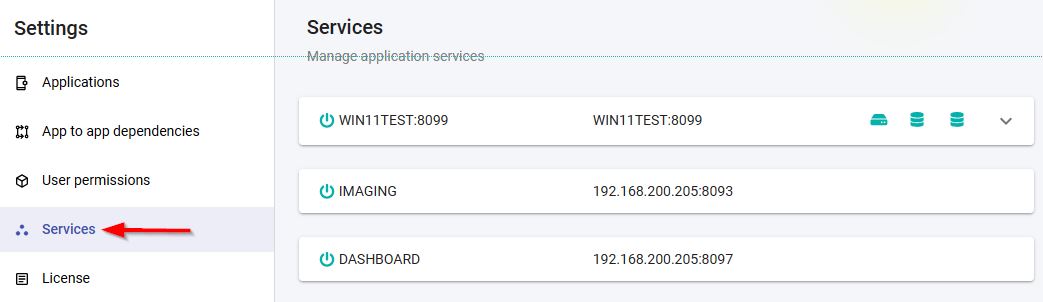
Verify that all components are available:
http://<IMAGING_SERVICES_HOSTNAME>:8090/admin/services
Step 7 - Configure authentication
Out-of-the-box, CAST Imaging uses Local Authentication (admin/admin) managed by Keycloak.
CAST recommends switching to your enterprise authentication system (LDAP or SAML) before onboarding applications. Access the Keycloak UI using the kcadmin account (or the value of KEYCLOAK_LOGIN_ADMIN_USER if customized during installation). See Authentication for full instructions, and Keycloak accounts and passwords for an explanation of each account provided and how to change its password.
Connect AI tools to your results
Optional. Expose this deployment’s results to AI clients such as GitHub Copilot, Claude Desktop and Cursor via CAST’s MCP (Model Context Protocol) Servers - standalone components, installed separately:
- MCP Server for CAST Imaging - query application architecture, transactions, quality insights and code objects in natural language.
- MCP Server for CAST Gatekeeper - query compliance status, technical debt, violations and quality metrics from your Dashboards in natural language.
Next steps
Uninstall
Need to remove this installation? See Uninstall CAST Imaging.