S4 - Dashboards Only (Windows)
Overview
This guide covers installing CAST Imaging in Dashboards Only mode on a single Microsoft Windows machine. This is a read-only deployment: users can view aggregated KPI dashboards from previously analyzed data but no analysis is performed locally.
What is installed:
| Component | Description |
|---|---|
imaging-services |
Front-end services: gateway, console, auth, SSO, control panel |
dashboards |
CAST Dashboards: Management, Engineering and Security |
When to use: Environments where analysis is performed on a separate CAST Imaging installation and users only need access to Dashboards results.
- This is a read-only deployment that performs no analysis itself. To generate the results consumed here, a separate CAST Imaging installation that includes the
analysis-nodecomponent (e.g. S1 or S5) must be installed elsewhere. See Standalone deployment workflow for more information about this deployment mode. - The database instance is not included in the Windows installer. A PostgreSQL database must be installed separately (on the same or another machine) before proceeding. See Database server install.
- It is not possible to add additional components to this deployment after installation.
- Certain settings and options in the CAST Imaging UI are not available in read-only mode.
- CAST Imaging Core is NOT required for this scenario.
- In offline environments, Extend Local Server must be deployed alongside this installation to pass through the initial Extend initialization settings despite the fact that no analysis is performed. See Extend Local Server install.
Requirements
The requirements below are tailored to this scenario (single machine, standalone mode). Before you install, read the full requirements pages, which cover all platforms and topologies in detail:
Hardware · Software · Database · Disk space
Components installed
| Component | Role |
|---|---|
imaging-services | Front-end services: gateway, console, auth, SSO, control panel |
dashboards | CAST Health/Management Dashboards (read-only KPIs) |
Hardware
- RAM: 32GB RAM absolute minimum
- Installation disk: approx. 20GB for the installation
- Analysis & result storage: 256GB minimum (1TB for multiple complex/large applications)
TCP ports
Only the ports for this scenario's components are listed (Microsoft Windows):
imaging-services
- 2381: Control Panel
- 8090: Gateway Service
- 8091: Console Service
- 8092: Authentication service
- 8096: SSO Service
- 8098: Control Panel
- 9002: SSO Service
dashboards
- 8097: Dashboard Service
Firewall: Open only port 8090 (TCP) inbound if you or your users need to access CAST Imaging from another machine on the network.
Database
CAST Imaging requires PostgreSQL. PostgreSQL 14.x-18.x (64-bit); 18.x recommended. Releases 16.x and above require specific com.castsoftware.imaging.core versions.
On Microsoft Windows, PostgreSQL is not bundled - install an official release yourself (for example from EnterpriseDB) before installing CAST Imaging.
Schemas created automatically:
general_measure(consolidated Dashboard results)control_panel(persistence)keycloak(persistence)
Software
Operating system, Java, supported browsers and user/service permissions apply. See the full software requirements and the disk space requirements.
CAST recommends disabling Quick Edit mode in your CMD window before running the install script. If Quick Edit is enabled, a mouse click will pause the script until a key is pressed.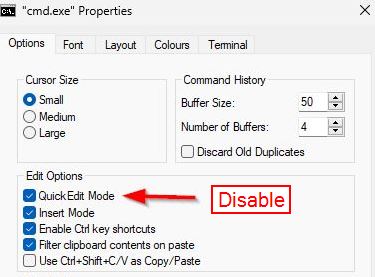
Before you start
-
Install the database: Install PostgreSQL on this machine or another machine accessible on the network before starting. See Database server install for instructions.
-
Extend Local Server: If your environment does not permit access to CAST Extend over the internet, you will need to install the Extend Local Server separately before completing this guide.
Step 1 - Download the installation media
Download the latest release of com.castsoftware.imaging.console from CAST Extend and unzip it anywhere on your local disk.
The folder path for the unzipped files must not contain any of the following characters: (, ), or !. The installer will fail if the path contains these characters.
The following files and folders will be created:
tools/(folder)cast-imaging-install.batcast-imaging-remove.batcast-imaging-update.batcomponents-installers.zipconfig-all.confconfig-imaging-services.confconfig-analysis-node.confconfig-imaging-viewer.confconfig-dashboards.conf
Step 2 - Configure the installation
Open config-imaging-services.conf and config-dashboards.conf (at the root of the installation media) in a text editor and update the installation variables.
The same shared variable values must be identical across both *.conf files.
LICENSE_KEY and EXTEND_API_KEY (optional)
To avoid being prompted for the global license key and CAST Extend API key on first login, you can pre-configure these variables in config-imaging-services.conf:
LICENSE_KEY=<your-license-key>
EXTEND_API_KEY=<your-extend-api-key>
See Installation variables for details.
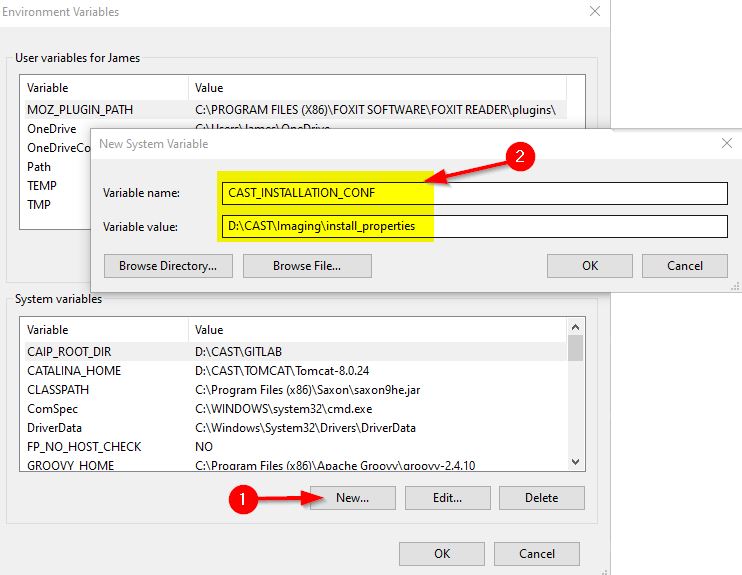
CAST_INSTALLATION_CONF (optional)
By default, the installer stores installation properties in:
%PROGRAMDATA%\CAST\CAST\.install
To use a different location, set the CAST_INSTALLATION_CONF Windows system environment variable to your preferred folder path before running the installer.
Firewall
For a single-machine deployment, open only port 8090 (TCP) inbound if you or your users need to access CAST Imaging from another machine on the network.
Step 3 - Run the installation
Open a CMD window with elevated permissions (right-click, Run as administrator) and run the following commands (one after the other) from the root of the unzipped files:
cast-imaging-install.bat package=imaging-services
cast-imaging-install.bat package=dashboards
Installation prechecks
Before it makes any change to the machine, the installer validates the environment it is about to install into: the operating system, the software it depends on, the hardware resources available, the ports it needs, and the endpoints it must reach. These checks run automatically and cannot be skipped.
Where a blocking failure is reported, the installation does not start and nothing on the machine is changed: resolve the reported condition and run the installer again. Where a warning is reported, the installation continues.
See Installation prechecks for the full list of checks, and the Precheck message reference for the meaning of a specific failure or warning message.
Installation logs
During installation, each console output line is prefixed with a date and time stamp (for example [2026-06-26 12:07:20][INFO]), and the same output is saved to a log file on disk for troubleshooting.
Log files are written to the following fixed location, which cannot be changed:
%PROGRAMDATA%\CAST\CAST\.install
Log files use the naming convention YYYYMMDDHHmm_cast-imaging-[install|update|remove].log. For example, an installation started on 26 June 2026 at 12:07 produces 202606261207_cast-imaging-install.log.
Log files are currently produced for the imaging-services, analysis-node, and dashboards components.
Step 4 - Verify the installation
Check that the following Windows Services are running (6 total):
| Component | Service name | Port(s) |
|---|---|---|
imaging-services |
CAST Imaging Authentication | 8092 |
imaging-services |
CAST Imaging Console Service | 8091 |
imaging-services |
CAST Imaging Control Panel | 2381, 8098 |
imaging-services |
CAST Imaging Gateway Service | 8090 |
imaging-services |
CAST Imaging SSO Service | 8096, 9002 |
dashboards |
CAST Imaging Dashboards | 8097 |
- All services are set to Automatic start. After a reboot, some services may fail to start because a dependent service has not started quickly enough. See Services startup checker for a tool that ensures all services are running.
- All services run as
LocalSystemunless you have configured a dedicated user via theSTART_AS_USER/START_AS_PASSWORDvariables. See Installation variables and Software requirements.
Step 5 - Initial startup configuration
If you pre-configured LICENSE_KEY and EXTEND_API_KEY, this initialization screen will not be shown.
Browse to:
http://<IMAGING_SERVICES_HOSTNAME>:8090
Log in using the default credentials: admin / admin
Available from 3.6.5-funcrel: on your first login after a fresh installation, if the admin account is still using the default password, you are redirected to a mandatory password change screen. After setting a new password, you must complete your user profile (first name, last name, and email address) before you can access CAST Imaging.
Configure the Licensing strategy. Choose one of:
Named Application- each onboarded application requires its own dedicated license keyContributing Developers- a global license key based on the number of contributing developers
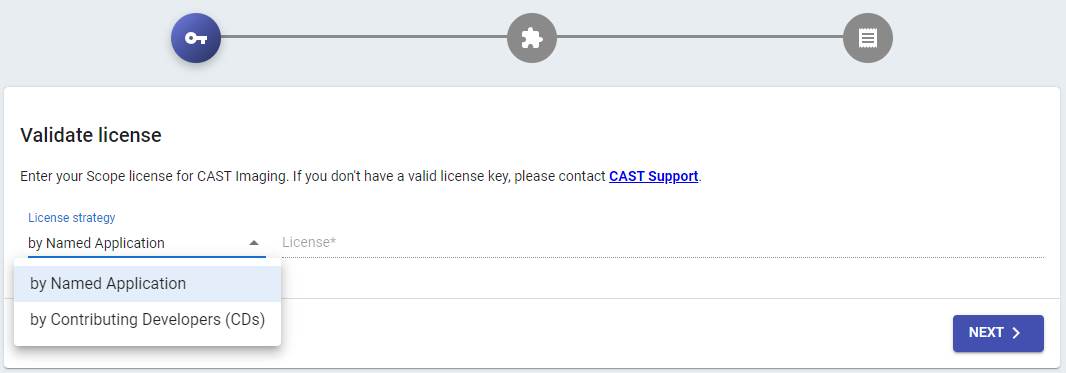
You can switch license key strategy after onboarding applications. See Manage your license keys.
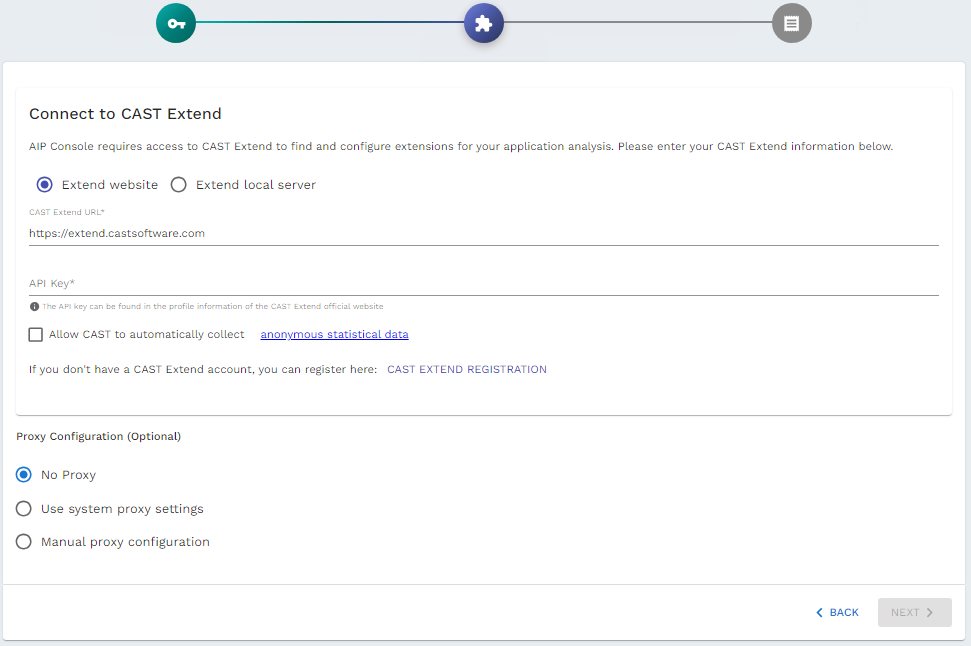
Configure CAST Extend settings and Proxy settings:
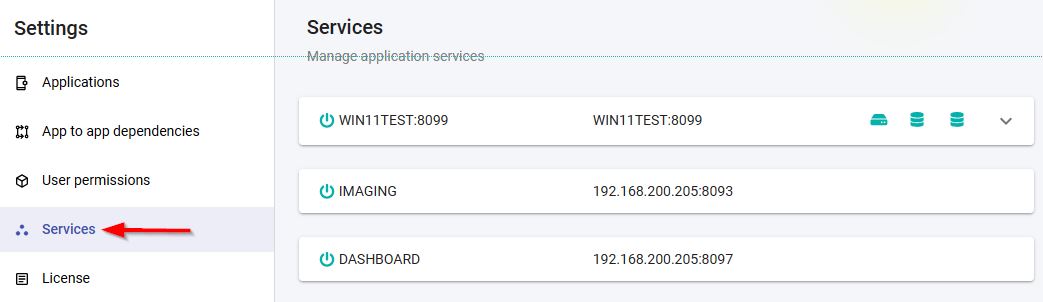
Verify that all components are available:
http://<IMAGING_SERVICES_HOSTNAME>:8090/admin/services
Step 6 - Enable Dashboards standalone mode
After installation completes, modify the following file to enable read-only mode for Dashboards:
(Create if it does not exist):
%PROGRAMFILES%\CAST\Imaging\CAST-Imaging-Control-Panel\application-default.yml
Add or set:
application:
  dashboard-standalone-enabled: true
Then restart the CAST Imaging Control Panel Windows Service.
Step 7 - Configure authentication
Out-of-the-box, CAST Imaging uses Local Authentication (admin/admin) managed by Keycloak.
CAST recommends switching to your enterprise authentication system (LDAP or SAML) before onboarding applications. Access the Keycloak UI using the kcadmin account (or the value of KEYCLOAK_LOGIN_ADMIN_USER if customized during installation). See Authentication for full instructions, and Keycloak accounts and passwords for an explanation of each account provided and how to change its password.
Connect AI tools to your results
Optional. Connect AI clients such as GitHub Copilot, Claude Desktop and Cursor to your Dashboards results via the MCP Server for CAST Gatekeeper - a standalone component, installed separately, that queries compliance status, technical debt, violations and quality metrics in natural language. See Getting started with CAST MCP Server for Gatekeeper.
Next steps
Uninstall
Need to remove this installation? See Uninstall CAST Imaging.